The pressure builds and you start counting down minutes until you eat. You pop that sealing ring in place and lock the lid on tight. You hear the subtle clicks and steam cues that tell you your cooker is working hard, creating the perfect broth depth for your chicken to soak up all that flavor.

You feel the anticipation as the steam starts to hiss, pressure build fills up fast, and your kitchen fills with the smell of garlic and paprika. You’re kinda excited because you know this ain’t your usual fried chicken – it’s Texan-style, with all that crispy goodness but quicker thanks to your cooker.
The timer’s ticking, slow release on the menu, and you keep imagining that golden crust and juicy bite ready to hit your plate. You get your sides ready, maybe some mashed potatoes or corn, and you can almost taste the mix of spices already. This is gonna be one heck of a homemade treat.
Why Your Cooker Beats Every Other Pot
- Your pressure cooker locks in moisture and cooks chicken evenly, no dry spots at all. For more on pressure cooking benefits, check out our pressure cooker safety tips.
- It builds pressure quick so you chop cooking time down by more than half. Try it with other delicious pressure cooker recipes for speedy meals.
- You get that broth depth almost like slow-cooked food without waiting hours.
- It’s perfect for locking in seasonings, so every bite hits with full flavor.
- Steam cues and easy slow release give you control without guesswork or mess.
All the Pieces for This Meal
Here’s what you gotta gather before you start cooking this country fried chicken. It’s pretty simple but each one counts.
- 2 boneless, skinless chicken breasts — around 6-8 ounces each is just right.
- 1 cup buttermilk to marinate and get that tangy tenderness going.
- 1 cup flour, a base for your chicken’s crispy coating.
- ¼ cup cornstarch to make that crust really light and crunchy.
- ½ teaspoon baking powder mixed in to help your coating puff just right.
- 1 teaspoon garlic powder for that savory punch.
- 1 teaspoon onion powder to round out the flavor.
- 1 teaspoon paprika to add a little color and warmth.
- ½ teaspoon salt and ½ teaspoon black pepper — adjust these or you’ll miss the point.
- ½ cup gravy (optional) if you want that extra something to ladle on top.

Your Complete Cooking Timeline
Step 1. Start by pounding those chicken breasts till even in thickness. It helps them cook better and stay tender.
Step 2. Pour your buttermilk into a shallow bowl, drop the chicken in, cover it up and stick it in the fridge at least an hour. You wanna get that soak going to make it tender and flavorful.
Step 3. While the chicken’s chillin, mix your dry ingredients — flour, cornstarch, baking powder, garlic powder, onion powder, paprika, salt, and pepper all together in a separate shallow dish.
Step 4. After marinade time’s up, pull the chicken out and let the excess buttermilk drip off. Then dredge each breast in your flour mix, pressing to coat well.
Step 5. Place that coated chicken on a wire rack and let it rest 10-15 minutes. This helps the coating kinda set so it won’t fall off during cooking.
Step 6. Heat about 1 inch of oil in a big skillet over medium heat until it gets to 350°F (175°C). This is where the frying action happens.
Step 7. Fry your chicken for 5-7 minutes on each side until golden brown and an internal thermometer hits 165°F (74°C).
Step 8. Take the chicken out and drain on paper towels to soak up any extra oil before plating up. Yum.
Smart Shortcuts for Busy Days
- Marinate chicken overnight so you’re ready to cook straight away next day.
- Pre-mix your flour and spice coating in a jar and shake it over chicken when you need.
- Use a meat tenderizer tool to speed up pounding the chicken evenly.
- Cook sides like mashed potatoes in your pressure cooker while chicken marinates.
- If you’re short on time, buy pre-cut chicken breasts that are already thin for quicker cooking.
That First Bite Moment
You see that crispy golden crust that’s perfect kinda rough and flaky without being crumbly. It’s exactly what you want from country fried chicken.
The smell hits you first — a warm garlic and smoky paprika aroma that makes your mouth water instantly. You can’t wait to dig in.
The chicken inside is juicy and tender, all thanks to the buttermilk soak and pressure cooker magic that keeps it moist.
And when you get that first bite you catch all those layers of flavor mixing on your tongue with the crispy crust and soft meat. It’s real comfort food done right.

Your Leftover Strategy Guide
Once you got leftovers, here’s how you wanna keep ’em fresh and tasty. First, cool down your chicken to room temp before storing.
Wrap each piece in parchment or paper towels so the crust doesn’t go soggy when you put ’em in an airtight container. Store in the fridge up to 3 days.
For longer storage, freeze the cooked chicken on baking sheets first so it doesn’t stick, then move it to freezer bags. That way it lasts 2-3 months.
To reheat, use an oven or air fryer to get the crust crispy again. Microwave works too but it can make things mushy.
If you wanna get creative, chop the chicken and toss it in a quick salad or sandwich for day two. Works real good.
What People Always Ask Me
- Q: Can I use chicken thighs instead of breasts?
A: Yeah, thighs work great and stay juicier but might need a bit more cook time. Try our best chicken thigh recipes for tasty ideas. - Q: What if I don’t have buttermilk?
A: You can mix 1 cup milk with 1 tablespoon lemon juice or vinegar and let it sit 5 minutes before using. - Q: Can I bake instead of frying?
A: Sure, bake at 425°F for 20-25 minutes but you won’t get the same crispy crust. - Q: Do I really need to let the coating rest?
A: Yeah, it helps the dredge stick better so it doesn’t fall all over your kitchen. - Q: How do I know when the chicken’s done?
A: Use a meat thermometer, look for 165°F internal temp. Safety first! More on safety in our pressure cooker safety tips. - Q: Can I use this recipe in my pressure cooker?
A: This version’s for stove frying, but you can brown chicken first, then finish in the pressure cooker with broth at low pressure and slow release to keep moisture.
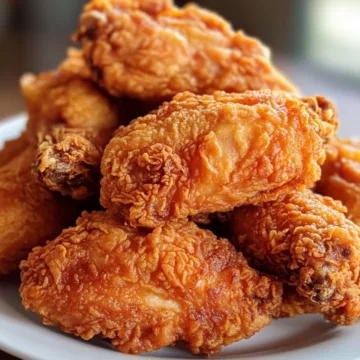
Texas Roadhouse Country Fried Chicken Recipe
Equipment
- 1 Mixing bowl for flour mixture
Ingredients
Main ingredients
- 2 boneless, skinless chicken breasts around 6–8 ounces each
- 1 cup buttermilk for marinating
- 1 cup flour for coating
- 0.25 cup cornstarch
- 0.5 teaspoon baking powder
- 1 teaspoon garlic powder
- 1 teaspoon onion powder
- 1 teaspoon paprika
- 0.5 teaspoon salt
- 0.5 teaspoon black pepper
- 0.5 cup gravy optional, for serving
Instructions
Instructions
- Pound chicken breasts to even thickness.
- Marinate chicken in buttermilk for at least 1 hour in the fridge.
- In a separate bowl, mix flour, cornstarch, baking powder, garlic powder, onion powder, paprika, salt, and pepper.
- Dredge marinated chicken in flour mixture and press to coat well.
- Let coated chicken rest on rack for 10–15 minutes to set the crust.
- Heat 1 inch of oil in skillet to 350°F (175°C).
- Fry chicken 5–7 minutes per side until golden and internal temp is 165°F (74°C).
- Drain fried chicken on paper towels before serving. Optionally serve with gravy.