
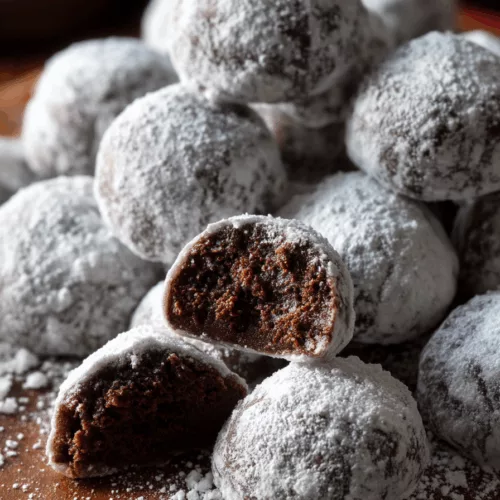
Chocolate Snowball Cookies is a awesome twist on traditonal holiday treats, it combines rich choclate flavor with a melt in your mouth texture thats really hard to resist. Theyre often dusted with powdered sugar so they look like little snowballs, bringing a festive spirit to any gathering. Perfect for cookie trays, gift giving, or just munching with a warm cup of cocoa on a cold winter night.
Holiday treats and festive cookies aint just desserts; theyre a way to celebrate the season, make special memories, and bring friends and family together. Whether you making them for a big party or a cozy night at home, cookies like Chocolate Snowballs give that joy and warmth we all love at Christmas time.
This articel will take you thru the history of snowball cookies, showing how they became so popular in diffrent cultures and changed over the years. We’ll explain what makes Chocolate Snowball Cookies unique, list the key ingredients that give them their tasty flavor, and share a step by step recipe. You’ll also get tips for the right texture, plus ideas for storing and serving. By the end, you’ll know how to bake these yummy treats and spread holiday cheer among your friends and family.

History of Snowball Cookies
Snowball cookies, also called by other names in diffrent places, have a long history that shows how much people love them. They started in parts of Eastern Europe and even Mexico, where folks would bake them for holiday celebrations and share them with neighbors. Back then they were a sign of community and kindness, helping families stick together when it got cold outside.
Over time, snowball cookies changed a bit to fit local tastes and ingrediants. The basic buttery, nutty base stayed the same, but people made new versions with different flavors and textures. Then chocolate got more popular and someone thought, why not mix it in? That’s how we got Chocolate Snowball Cookies, the warm, indulgent treats we enjoy today during holiday seasons and festive get-togethers.
What Are Chocolate Snowball Cookies?
Chocolate Snowball Cookies are a more decadent version of regular snowball cookies, known for their rich chocolate taste and super soft texture. When you bite into one, it almost melts in your mouth, with a little crunch from finely chopped nuts. The outside is rolled in powdered sugar, giving a nice contrast to the dark chocolate inside, making them look and taste even better.
The special taste comes from a blend of simple but key ingrediants. Unsweetened cocoa powder gives it that real chocolate flavor, while butter and powdered sugar make it smooth and melt-y. Chopped nuts like walnuts or pecans add a yummy crunch and nutty smell that set these cookies apart from others like Russian Tea Cakes or Mexican Wedding Cookies.

Ingredients for Chocolate Snowball Cookies
To make these delicious cookies, you’ll need:
- Unsweetened cocoa powder: for that deep chocolate taste
- Butter: unsalted, to get a smooth, creamy dough
- Powdered sugar: in the dough and for coating
- Flour: all-purpose for structure
- Chopped nuts: walnuts or pecans for crunch
- Vanilla extract: just a splash to boost flavor
- Salt: a pinch to balance the sweetness
Optional twists:
- Chocolate chips: fold in a handful for extra chocolate bits
- Peppermint extract: a few drops for a minty kick
Step-by-Step Recipe for Chocolate Snowball Cookies
Preparation
First, get these tools ready: mixing bowls, baking sheets, a cookie scoop or tablespoon, and parchment paper. Preheat your oven to 350°F (175°C).
Mixing the Dough
Cream together 1 cup of softened unsalted butter and ½ cup of powdered sugar in a big bowl until it’s light and fluffy. Then mix in 2 cups of all-purpose flour, ½ cup of unsweetened cocoa powder, a pinch of salt, and 1 teaspoon of vanilla extract. Stir until it’s all blended. Finally, fold in 1 cup of finely chopped nuts.
Shaping the Cookies
Grab small chunks of dough and roll them into balls about 1 inch across. You can use a cookie scoop or just your hands to keep them the same size. Place them on a parchment-lined baking sheet, leaving some space around each one so they don’t stick together.
Baking Instructions
Bake for 10–12 minutes. You’ll know they’re done when the edges look firm but the centers still a bit soft. Take them out and let them cool on the sheet for a few minutes, then move them to a wire rack to finish cooling.
Coating the Cookies
When the cookies are cool, gently toss them in a bowl of powdered sugar until they’re well coated. For extra fun, put them on a holiday platter or in cute gift bags to give to friends and family.
Tips for Perfect Chocolate Snowball Cookies
- Don’t overmix: Stop stirring once the dry ingredients are just combined so you keep them tender.
- Chill the dough: Pop it in the fridge for about 30 minutes before rolling so the cookies hold their shape.
- Flavor ideas: Try different spices or extracts to make them your own.
Storage and Serving Suggestions
Keep cookies fresh by storing them in an airtight container at room temp for up to a week. If you want to save them longer, freeze in a single layer and then move to a freezer bag—good for about three months.
Serve them on festive trays or pack them in cute bags tied with ribbon. They go great with milk, a warm mug of coffee, or even dessert wines for holiday parties.
Popular Variations of Chocolate Snowball Cookies
- Peppermint Chocolate Snowballs: add peppermint extract for a mint twist
- Mocha Snowballs: mix in some instant coffee or espresso powder
- Gluten-Free: swap the flour for a gluten-free blend
- Vegan: use plant butter and egg replacer
Frequently Asked Questions (FAQs)
Can I freeze Chocolate Snowball Cookies?
Yes, they freeze really well. Let them cool, then freeze on a tray before moving to a freezer bag. Thaw at room temp before eating.
How can I make these cookies gluten-free?
Just use a good-quality gluten-free flour blend instead of regular flour. That’s it!
Can I add chocolate chips to the recipe?
Sure, fold in ½ cup of chocolate chips with the nuts, but note it might change the texture a bit.
What’s the best way to store these cookies?
Store in an airtight container at room temperature. You can refrigerate if you want them longer, but keep them sealed so they don’t dry out.
Can I use brown sugar instead of powdered sugar?
You could, but the cookies will be denser and chewier. If you try it, use brown sugar just for the dough and keep powdered sugar for rolling.
Conclusion
Baking Chocolate Snowball Cookies is a fun way to make lasting memories with loved ones during the holidays. Whether it’s a big gathering or a quiet night in, these cookies are sure to bring smiles and tasty moments to everyone who tries them.
Chocolate Snowball Cookies
Equipment
- 1 mixing bowl
- 1 baking sheet
- 1 parchment paper
- 1 whisk
- 1 cookie scoop or tablespoon
- 1 oven
Ingredients
- 1 cup all-purpose flour
- ½ cup unsweetened cocoa powder
- ½ teaspoon baking powder
- ¼ teaspoon salt
- ½ cup unsalted butter Softened
- ½ cup granulated sugar
- ¼ cup brown sugar Packed
- 1 teaspoon vanilla extract
- 1 large egg
- 1 cup powdered sugar For rolling cookies
Instructions
- Preheat your oven to 350°F (175°C) and line a baking sheet with parchment paper.
- In a mixing bowl, whisk together the flour, cocoa powder, baking powder, and salt. Set aside.
- In another bowl, beat the softened butter, granulated sugar, and brown sugar together until light and fluffy.
- Add in the vanilla extract and egg, mixing until well combined.
- Gradually incorporate the dry ingredients into the wet mixture, stirring until a dough forms.
- Use a cookie scoop or tablespoon to portion out the dough, rolling each ball into a 1-inch size.
- Place the cookie balls on the prepared baking sheet, leaving some space between each.
- Bake in the preheated oven for 10-12 minutes, until they are set but still soft.
- Allow the cookies to cool on the baking sheet for about 5 minutes before rolling them in powdered sugar while they are still warm.
- Let the cookies cool completely on a wire rack, then roll them in powdered sugar again for a snowy finish.
- For added flavor, consider mixing in chocolate chips or experimenting with different extracts.
- Store the cookies in an airtight container for up to one week.



