
When I first tasted Clafoutis in my aunt’s sunlit kitchen last spring it was loaded with ripe cherries and sweet egg custard. I was juggling a fussy toddler and a half empty shopping bag that needed more baking staples. You may not believe but that day I learned a simple French dessert can feel like family evening therapy.
I had no fresh fruit at home so I grabbed a bag of frozen cherries from the back of my freezer. I didnt know if it would work but I whisked eggs milk sugar and a hint of vanilla. Once it slid into the oven I tried to calm my son down while the sweet aroma filled the hall.
When I pulled that golden baked Clafoutis from the rack I couldnt believe how fluffy the custard was and how the cherries popped in every bite. My son paused play to peek at the hot pan and he let me cut him a warm slice that dripped with syrup. Youll see how easy this dessert can win big smiles.

Ever since that day I found that baking a Clafoutis is a breeze when you know the basics. You only need a few simple ingredients and a regular oven to treat your family or guests to a classic French dessert thats both rustic and elegant.
Top reasons you will love this Clafoutis
- The blend of fresh cherries and smooth egg set custard bakes in one dish giving you a perfect mix of fruit and pudding in every forkful
- You can use frozen fruit or fresh picks so your baking stays flexible and your pantry staples turn into an elegant French dessert in under an hour
- Its a great make ahead dessert at brunch or dinner since you can bake early chill the dish and serve at room temperature without losing flavor
- Its gluten free when you swap in almond flour or rice flour and gives your family an easy treat with minimal prep and a signature rustic look
Pantry highlight lineup
- Fresh cherries or frozen pitted berries work best for a rich cherry Clafoutis they add natural sweetness and a slight tart finish when baked in the egg based custard mixture
- Eggs farm fresh or store eggs at room temperature help the custard set with a light sponge texture that holds fruit in place and slices cleanly
- Milk whole milk or half and half can be swapped with yogurt or coconut milk for dairy free twist but keep the smooth flow needed for even baking
- All purpose flour or a mix with rice flour gives the batter structure you could also try almond flour for a crumb free and gluten free version
- Granulated sugar or brown sugar both sweeten up the batter brown sugar adds a slight molasses note and a darker crust around the edges
- Vanilla extract or almond extract adds its own aroma if you want to tease out deeper hints a sprinkle of cinnamon or nutmeg warms the flavor
Step by step with reasons
- Step 1 Preheat the oven to 350 F and set the rack in the middle this heats the pan evenly warming up the dish before the batter goes in so you end up with a golden crust and soft center every time dont skip this step to keep your bake consistent
- Step 2 Butter the baking dish well and dust a light coat of flour this simple practice keeps the custard from sticking and yields crisp edges it also helps you slide slices out clean for a neat look when you serve and clean up is faster too
- Step 3 In a bowl whisk together eggs sugar and pure vanilla extract until smooth and slightly frothy this trapped air helps the custard rise and gives your Clafoutis a pillowy texture that feels light yet creamy
- Step 4 Stir in the flour and a pinch of salt slowly so you avoid lumps this step builds the structure needed for the custard to hold the cherries its best to sift the flour to keep the batter smooth
- Step 5 Stream in milk or half and half while continuing to whisk this gives the batter a uniform finish and a silky flow which keeps the bake even you dont want grainy spots in the dessert
- Step 6 Arrange the cherries in the bottom of your dish and then pour the batter over the top this ensures the fruit stays suspended in the custard making each portion give you generous fruit with every bite
- Step 7 Bake the dish for about forty five minutes until puffed and golden and a toothpick inserted comes out clean this confirms the custard is set just right and the cherries have warmed through without turning mushy
My best time savers in the kitchen
- Measure and separate everything at the start I crack eggs measure sugar flour and pour milk into prep bowls off to one side This mise en place style lets me whip up the batter in less than five minutes and it cuts down on spills or missing one ingredient and makes clean up faster before the oven gets too hot
- Warm the baking dish in the oven as it heats up I place my dish inside for five minutes before I add the batter this simple hack keeps the sides cooking evenly saves you from a cold spot and gives you a uniform rise across the whole Clafoutis dont burn yourself use an oven mitt each time you do this
- Use a broad whisk or handheld blender to beat your batter you dont need electric mixer this cuts down on clumps and you get a glossy smooth mix in seconds it also keeps cleanup to a minimum since you only use one tool faster than hand mixing
- Clean as you go washing bowls utensils and measuring cups right after use this habit prevents a big pileup at the end and saves you ten minutes of scrubbing later plus your kitchen stays tidy while you concentrate on finishing the Clafoutis
That first hmmm moment
The first time I sliced into my homemade Clafoutis I froze in place for a second when a soft cloud of warm steam rose up and carried that sweet fruit scent straight to my nose. I let the fork hover and took a careful bite tasting that gentle egg custard with the bright cherry pop
My friend who had never liked cooked fruit tried it next she closed her eyes and leaned in she said that she couldnt believe how the cherries kept their shape yet melted into the creamy batter with each bite I knew Id found a winner
From that moment Ill never skip an opportunity to bake a Clafoutis its comfort food and a fancy dessert in one dish. Youll love the look on faces when you bring out that warm pan of French dessert charm
Fun ways to serve your Clafoutis
- Top with a scoop of cold vanilla ice cream this contrast of hot and cold gives you a creamy finish and lets the custard settle while the ice cream melts into the baked cherries
- Drizzle fresh berry sauce over each slice a quick blend of raspberries sugar and lemon juice heated for a few minutes gives a bright fresh coulis that livens up the baking flavors
- Serve with a dollop of whipped coconut cream and a sprinkle of toasted almonds for a dairy free spin that adds crunch and rich nutty taste to the soft egg set dessert
- Dust powdered sugar across the top and garnish with mint leaves for a simple elegant presentation at brunch or dinner your guests will feel like they are eating at a bistro table
- Chill leftover slices and serve with a spoonful of thick Greek yogurt and honey this pairing gives a tangy counterpoint to the sweet fruit and makes the bake feel lighter
Storing and warming up later
To store your Clafoutis wrap the cooled dish in plastic wrap or aluminum foil and place in the fridge it stays fresh for up to four days the custard firms up as it cools but you can warm it again to bring back that soft texture
If you want to freeze slices cut the cooled dessert into portions wrap each piece tightly in foil then slip them into a freezer safe bag they last for about two months letting you enjoy a quick treat whenever you like
To reheat dont use microwave it can make the custard rubbery instead pop slices onto a baking sheet and heat at 325 F for ten minutes this warms through the center and restores the crisp edges youll act like you just baked it

Final thoughts and your questions answered
As I close this guide on Clafoutis Im still grinning thinking about that first hot slice and how the custard melted around bright cherries. You dont need fancy gear just a bowl whisk and an oven ready to bake. With simple pantry staples you bring a taste of French dessert tradition to your table. Give it a try on your next busy weeknight and watch your family light up
What other fruit can I use You can swap cherries for berries peaches plums or sliced apples each brings its own texture and sweetness level just adjust your baking time if the fruit is extra juicy to avoid a soggy custard base
Can I make this dairy free Yes you can use coconut milk almond milk or soy milk in place of dairy milk and swap butter for coconut oil the custard still sets nicely and you get a subtly different flavor profile in your French dessert
Is this dessert gluten free You can make it gluten free by using almond flour rice flour or a gluten free flour blend instead of all purpose flour just keep the ratio the same and you get a tender custard that holds fruit well
How do I know when it is done It is ready when the top is puffed and lightly golden a toothpick inserted near the center should come out mostly clean if you see wet batter let it bake a few more minutes
Can I prepare the batter ahead Yes you can mix the batter a few hours ahead store it covered in the fridge then pour it over the fruit right before baking this keeps the texture fresh and the custard rises up nice
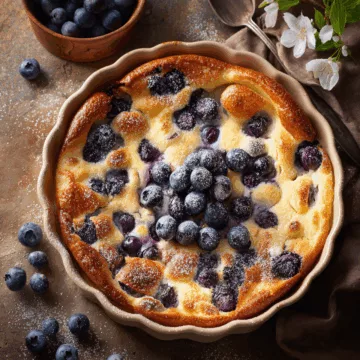
Clafoutis
Equipment
- 1 mixing bowl
- 1 whisk
- 1 measuring cups and spoons
- 1 9-inch (23 cm) round baking dish
- 1 oven
Ingredients
- 1 cup all-purpose flour
- 1 cup milk
- 3 large eggs
- ¾ cup granulated sugar
- 1 teaspoon vanilla extract
- ¼ teaspoon salt
- 2 cups pitted cherries Fresh or frozen.
- Butter for greasing baking dish
- Powdered sugar for serving Optional.
Instructions
- Preheat your oven to 350°F (175°C). Grease the baking dish with butter.
- In a mixing bowl, whisk together the flour, sugar, and salt.
- In another bowl, beat the eggs until well combined. Add the milk and vanilla extract, mixing well.
- Gradually add the wet ingredients to the dry ingredients, whisking until smooth and combined.
- Pour half of the batter into the greased baking dish.
- Evenly distribute the pitted cherries over the batter.
- Pour the remaining batter over the cherries.
- Bake in the preheated oven for 45 minutes, or until the clafoutis is puffed and golden brown. A toothpick inserted in the center should come out clean.
- Allow to cool for a few minutes before serving. Dust with powdered sugar if desired.



