
I’m standing at my counter with all the mess of baking around me. My neighbor pops in again telling me to think about heat and how it shapes flavor. He’s obsessed with that stuff. Me I just wanna dive into my fudgy chocolate brownie pie but I remember his words. Heat is more than just hot air it is the very heart that brings out real depth in this rich treat.
So as I stir melted chocolate into butter and crack in eggs I picture slow and low heat coaxing a deep taste. I think about Maillard browning on the edges and gentle caramelization in the gooey middle. I tell myself to maybe rest the batter a bit so proteins settle and give a firmer crumb. The oven preheats as I reflect on heat science cousins playing their part in a simple dessert turned epic.
Understanding Heat And Flavor In Our Brownie Pie
When I slide the pan into the oven it is not just baking it is a controlled flavor transformation. Low and slow heat helps develop that sticky middle that wont dry out. If I crank the temperature too high the edges will race ahead in Maillard browning leaving the center underdone or gritty. Finding the right balance is key.

Caramelization of the sugars in chocolate and brown sugar also happens best at a steady pace. I think about slow simmer I do when I melt chocolate on the stove. That same care applies here. And after baking letting the pie rest is like a little protein rest it helps the structure set so every slice holds together with perfect fudgy texture.
Pantry Heroes For Fudgy Chocolate Brownie Pie
- Bittersweet Chocolate at least 70 percent cocoa for the richest flavor
- Unsalted Butter for browning and that silky mouthfeel
- Brown Sugar for moisture and natural caramelization
- All Purpose Flour just enough to give structure not to make it cakey
- Large Eggs room temperature eggs help bind and give a fudgy crumb
- Pure Vanilla Extract a small splash for aroma uplift
- Coarse Salt a pinch to balance sweet and enhance chocolate notes
- Optional Chopped Nuts for crunch and contrast if you like textures
These pantry staples turn into something heavenly when heat gets to work. Everything is basic stuff that almost any kitchen has. The key is using good quality chocolate and fresh eggs.
Having these on hand makes jumping into baking a breeze. I always double check my pantry before I start mixing because nothing kills a baking mood like realizing you need to run to the store in the middle.
Getting Ready At The Workstation
First I clear the counter of clutter so I can move freely. A messy workstation leads to distractions and error. I set out my mixing bowl measuring cups and a whisk. I grab my square pie dish or pan depending on what I have. Then I preheat the oven to 325 degrees which is lower and slower than most brownie recipes call for.
- Step One Preheat confirm the oven is at 325 degrees for even heat distribution
- Step Two Line Pan fit parchment into the bottom and up the sides for easy removal
- Step Three Melt Chocolate use a double boiler on low heat or a gentle slow simmer method
- Step Four Brown Butter let it cook until smells nutty but watch closely it can go from golden to burnt quick
- Step Five Combine Ingredients whisk eggs sugar and vanilla before folding in flour and chocolate
Having tasks grouped this way helps me avoid missing a critical part. Plus the bold steps keep me on track when I glance away. It is easy to get caught up in browning the butter that I forget to line the pan.
Once my prep is done I take a second to breathe and look at the lined pan waiting for the fudgy batter. Its like the stage where everything could still go wrong but you feel hopeful.
The Scent Of Deep Chocolate Filling The Air
About ten minutes into baking I crack the oven door just a hair to let some steam escape. The smell hits me like a wave of warm hugs. Rich dark chocolate aroma swirls around and lingers on my fingers. It is a scent that reminds me of childhood treats and rainy afternoons.

The kitchen becomes a smell lab with layers of scent evolving. The brown sugar brings a toffee like note as happy as caramelization in real candies. I catch hints of burnt butter from that step earlier. Heat shapes these aromas so just breathing feels like a reward.
Mid Bake Checkpoint And Visual Clues
At around twenty five minutes I slide in a wooden skewer near the center. If it comes out with a few moist crumbs but not liquid batter I know I am on the right track. That is when Maillard browning is working on the edges and the center is still holding enough moisture for a fudgy bite. If I see batter I know I need a bit more time.
I also peek at the crust it should look set and slightly cracked but not dry or crumbly. Those cracks are telling signs that internal steam is doing its job without overcooking. If it is pulling away too much from the pan sides I might lower the heat or cover lightly with foil for the last few minutes.
Testing For Fudgy Perfection
When the skewer test feels right I turn off the oven but leave the pie inside for another five to ten minutes. This little protein rest lets the structure firm up. If I pulled it out cold it could slump or fall apart. This time is as crucial as the bake itself.
Then I transfer the pan to a wire rack. Watching the steam rise I know that low and slow baking and that brief rest paid off. The top looks glossy yet firm and I can tell by feel that the inside wants to be fudgy not cakey.
Serving With A Simple Flair
I slice the pie when it is mostly cooled but still slightly warm. I grab a long sharp knife and wipe it between each cut so slices stay neat. Warm slices are my favorite because they ooze fudge and taste extra rich.
Plating is simple I add a dusting of powdered sugar or a few berries for contrast. A small scoop of vanilla ice cream on the side or a dollop of whipped cream is perfect if you like that chill meets warm moment. No need to get fancy just let the fudgy chocolate speak for itself.
Leftover Pie Creativity
When I have slices left I wrap them individually in plastic wrap and store in the fridge. Next day I can pop one slice in the toaster oven for a minute or microwave a bit and it tastes almost fresh. The edges crisp up while the center stays molten.
If I have more than a slice I cut the leftover into cubes and freeze. These brownie bites can be used later in milkshakes or ice cream as mix ins. You will thank yourself for this hack when craving a quick sweet bite.
Wrapping Up And Common Questions
This fudgy chocolate brownie pie is all about heat control and knowing when to step back. Low and slow bakes bring out deep Maillard browning and gentle caramelization so you taste real depth not burnt edges. Resting the pie is as vital as the bake so it wont fall apart on the plate.
Remember to line your pan and test with a skewer. Aim for a few moist crumbs not wet batter. Let the pie rest inside the turned off oven then cool on a rack before slicing for best results. It really is about attention to heat science cousins like protein rest working in harmony with flavor.
- Can I use milk chocolate instead of bittersweet Milk chocolate has more sugar and less cocoa so texture might be softer and overly sweet but you can try adjusting sugar down a bit
- Why did my edges get too crisp Your oven might run hot try lowering temperature by ten degrees or cover edges with foil halfway through
- How do I store leftovers Wrap slices individually and refrigerate up to four days freeze for longer use
- Can I add extra mix ins Yes nuts or chocolate chips work great just fold them gently into batter before baking
- What is the best way to reheat Pop a slice in the toaster oven for a minute or microwave for ten seconds for that warm melt in your mouth moment
Now go ahead bake this pie and remember how heat shapes flavor every step of the way. Your kitchen will smell unbelievable and every bite will remind you why heat science matters in dessert.
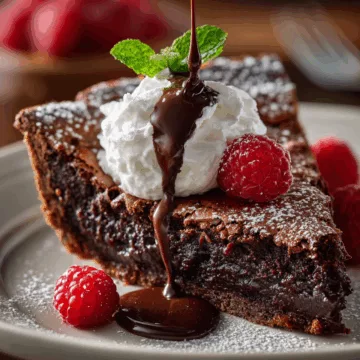
Fudgy Chocolate Brownie Pie
Equipment
- 1 9-inch pie pan
- 1 mixing bowls
- 1 saucepan
- 1 whisk
- 1 rubber spatula
- 1 measuring cups and spoons
- 1 oven
Ingredients
- ½ cup unsalted butter
- 1 cup granulated sugar
- 2 large eggs
- 1 teaspoon vanilla extract
- ⅓ cup unsweetened cocoa powder
- ½ cup all-purpose flour
- ¼ teaspoon salt
- ¼ teaspoon baking powder
- ½ cup semi-sweet chocolate chips Optional for extra fudginess.
Instructions
- Preheat the oven to 350°F (175°C).
- In a medium saucepan, melt the butter over low heat. Once melted, remove from heat and stir in the sugar, eggs, and vanilla until combined.
- In a separate bowl, whisk together the cocoa powder, flour, salt, and baking powder.
- Gradually add the dry ingredients to the butter mixture, stirring until just combined. Do not overmix.
- If using, fold in the chocolate chips for extra fudginess.
- Pour the brownie batter into a greased 9-inch pie pan and spread it evenly.
- Bake in the preheated oven for 30 minutes, or until a toothpick inserted into the center comes out with a few moist crumbs.
- Allow to cool for at least 15 minutes before slicing and serving.



